(Or: How I Learnt to Stop Worrying and Love the Code)
How I Learnt to Write Apps (A Summary)
As my regular readers will know, I have been writing Apps for Android Smart Phones. Here is where I share some of my experiences, and technical details. Partly to bring my audience an informative, entertaining insight into my brain-space, and partly to clarify in my own head what is going on!
The Set-up
The first thing I need is an Environment in which to write Code. This can be done with a simple text-editor (such as Notepad, or its big brother Notepad++), but more useful is the Official IDE (Integrated Development Environment) Android Studio. A simple task to download and install.
Simple, but time-consuming. A 758MB download, which, on install, will update itself, and fetch a variety of libraries, the Java SDK, and other assorted extras.
I will also need some way of testing my code. Luckily I have a variety of old Android Phones, and a Tablet. I chose most recent phone that I am no longer using (Samsung J5). This needs drivers finding and installing, and setting some developer Options to allow me to write Apps directly to it, rather than downloading from the Google Play Store.
I could have relied up on the built-in Android Emulator, but even on Lucretia‘s Power-House Gaming Rig, it is painfully slow to use (an hour to build and transfer a small app, rather than a couple of minutes to a real phone!)
The Inevitable “Hello World” App
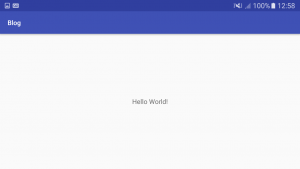
Android Studio presents a default App: the ubiquitous “Hello World”. This gives me an opportunity to learn the very basics of what an Android App looks like:
- A Main Activity file, that stores the main code (Java)
- A Layout file, telling the App what to display on the screen (XML)
- A set of Resource files (Pictures – known as “Drawables”, Values – constants for use in the app, codes for Colours and Styles, and many other options)
- The IDE files – Manifest, Gradle, etc (Do not worry about these yet. Most are automatically created by the IDE)
There are a whole bunch of options when creating an App, such as which version of Android you wish to target, and what is the lowest you will be writing for, how much code you would like the IDE to start with (depending on which Template you choose), and names for your Project, App, and Files. These soon become second-nature.
To test that everything in installed and connected correctly, I hit the “Run” button, and wait for the “Gradle Build Running” message to clear …
The Initial Bug-Hunting
Obviously, things did not go as smoothly as they should.
The IDE could not detect my phone, so I had to hunt down and install the correct drivers. I had failed to set the Developer Options correctly on my phone. The App was set to a newer version of Android than my phone used …
This was all relatively painless to fix, but put me in the mindset that I was to keep: There WILL be bugs!
But eventually, I had my App!

Writing My Own App
First, I fiddled about with some basics, to get my head around how the IDE worked, and learn the very simplest Java code.
Changing the text from “Hello World!” to “Hello Mad Dwarf!”. Using different colours. Adding a picture. Randomly choosing a Name to say “Hello” to. Inputting a name to be displayed.
None of this was without problems, but Google and Stack Overflow provided some solutions, and soon I was ready to build an actual, functional App!
Idea: an Inspirational App, providing a set of Randomly Generated Lists for use in Role-Playing Games.
Several choices needed to be made: What lists do I include? How complex? What data-structure do I use?
Reading up on data-structures, I chose to store all of my data in XML Arrays in my Resources/Strings file. This uses a very simple syntax:
<string-array name=”clothes”>
<item>Shirt</item>
<item>Trousers</item>
</string-array>
A little experimentation with layouts, and I could display a Button labelled Clothes, and have it react to being pressed.
Technical Notes
When defining the Text Label for the Button, the IDE complains if you enter the text directly. The preferred manner is to define a String, and then call that String as needed.
<string name =”clothes_button”>Clothes</string>
android:text=”@string/clothes_button”
Next, I need to “Start a new activity”, and pass it the chosen List title. To check this actually works, I make sure I have a couple more lists, and label them, and the Buttons need @ID codes, and an OnClickListener that will call the @ID of the pressed Button. So, new File. I already have “Main Activity”, so I create “Display List Activity” … and this is where the “fun” begins …
New Activities
These are launched by defining an Intent, which tells the App which activity you want to launch, and you can add “Extras” to this, which the new Activity can read. I add a “Message” that is the @ID of the button (“clothes”, “alchemy”, “monsters”, etc). This new Activity will need its own XML Layout File (Advanced: You can define this in the Activity. For now, I don’t).
This new Activity can retrieve the “message” (“Extra”), and call the associated List (I made them the exact same name, for simplicity).
Recycling for Beginners
When I last took a foray into Java/Android, the recommended way of showing a List was to use “List View”. While checking online to remind myself how to build a List View, I found that it has been replaced by “Recycler View”, a way of “recycling” a view, to show lists … It is actually very similar to use, but more flexible (it can display in List, Grid, or Card format!)
I also need the screen to be able to Scroll, if the List goes off the bottom of the screen. Very simple. Define a Scroll View to contain the Recycler View.
I also need to use (according to Stack Overflow!) a Recycler Helper; a secondary file that does the heavy lifting of being sent a list of data. creating holders, binding the list of data to the holder and sending it back to the Activity to display.
Overall, quite a pain to learn, but very useful once done.
In Summary
- Create several lists (String-Arrays) in Strings file.
- Display Labelled Buttons
- “Listen” for a button being pressed, and launch the next activity, telling it which button.
- New Activity calls the appropriate List, and sends it to the Helper to process.
- Display the processed List in a Scrolling Recycler View.

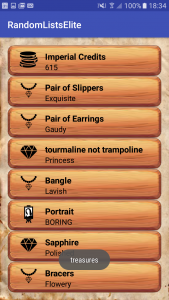
Loot! 
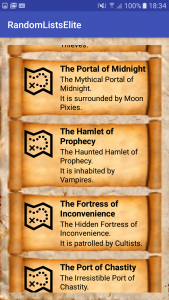
Places!
With a few added features (like randomising which random list to use: Cash, Jewellery, Gems or Art), I have an APP!
If you feel you’d like to write apps, but are put off by how complicated it looks, why not have a go! Yes, you will hear me screaming into the void about bugs, typos, stupid decisions (by me, the IDE developers, and Google/Android!), and generally pulling all of my hair out, but it is very rewarding!
